- Start Up
- How to manage user identity
- How to manage password
- How to manage CAs
- How to manage policies
- How to manage groups
- How to search
- How to download a file
- How to manage downloads
- How to add items for sharing in the database
- How to remove shared items
- How to update shared items
- How to synchronize shared items against the local file system
- Preferences
Start Up
When the user starts the application for the first time a dialog window will pop up asking the user to set the security device password. The user should take care when choosing this password as it is used to secure the application state. The user will be asked to supply this password every time the application is started.
If the user succeeds when entering the password, then User Identity dialog will pop up asking the user to select a user identity. By default a Pseudo User identity will be available for selection. This will allow the user into the system with limited privileges. Users are encouraged to create a personal identity (see the User Identity section for more details). The user identity dialog will also appear every time the application is started.
At this point, the user will be able to manage locally the items for sharing. In order to send and receive requests the user should start the services for sharing metadata and data. This can be done by clicking on "Connect" menu item from "File" menu in the main frame. Each time the user changes the setting in the sharing pane of preferences, "Reconnect" item from "File" menu should be clicked in order to update the new settings. Clicking on "Disconnect" will stop all the services. User has the option to connect the services at the runtime by checking "Connect on Start Up" option in Sharing pane of Preferences.
Security
User Identity
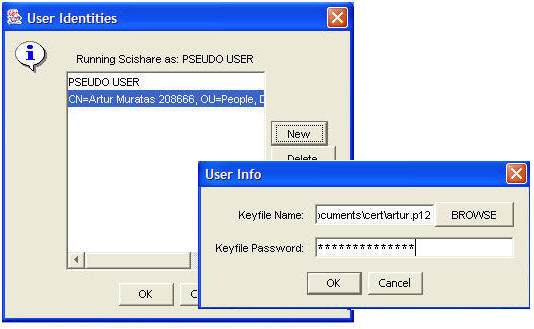
When the user starts the application for the first time, Scishare will use the default settings that identifies the user called PSEUDO USER. Pseudo users are provided with automatically generated X.509 certificates and have access to public resources. However, these peers cannot be granted higher levels of trust in the system. Even though the application runs in a secure state where the user can use and create policies to protect the metadata and data and communicate with other peers through TLS, it is highly recommended that the user should use their own p12 file to login. The advantage of this, is that the user has more privileges to access resources (metadata and data) from other users running scishare. When managing "User Identity", the user has the following options:
- Create new user identity - To create a new user identity the user clicks on "New" and a dialog will pop up asking the user to enter his p12 file and the password for that file. If "OK" button is clicked, then the selected user identity will be used to identify the user in communication with other users.
- Delete user identity - To delete a user identity from the list of user identities the user selects the user identity and clicks on "Delete" button.
- View user identity - To view a selected user identity, the user clicks on "View" button. The result will be another pane that displays the information contained in the certificate issued for this user.
Password Manager
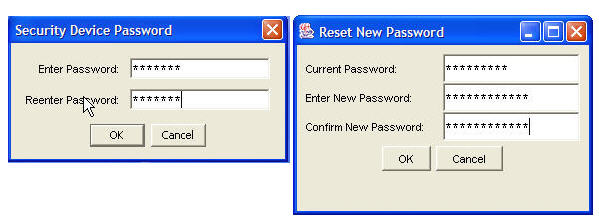
This is a standard dialog window that allows the user to change the security device password. This is the password that the user enters each time the application starts. Here are two dialogs where the password is created for the first time and changing it after:
Manage CAs
This allows the user to add, delete, and view certificate authorities from the list of CAs that is availbale. By adding a CA to this list, the user in fact has created a trusted list of all the users who have this CA. As a result, they all will have access to the resources that have TRUSTED policy protection. The user can also delete or view a selected CAs.
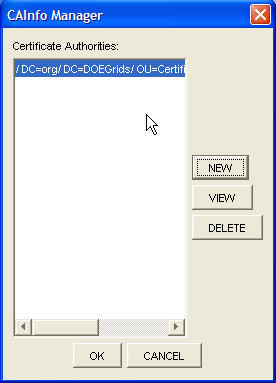
Managing the CAs can be done through Security or when the application starts for the first time and the user has the following options when calling "CAInfo Manager" dialog window:
- Add new CA - To add a new the user clicks on "New" button which creates URL Panel dialog that allow user to retrieve CAs.
- Delete a CA - To delete a selected CA, the user clicks on "Delete" button.
- View a CA - To view a selected CA, the user clicks on "View" button. This action will pop up another panel showing the information regarding to this CA.
Manage Policies
In order to protect the resources the user creates policies and map them to the resources. The policies are editable, where the user can add or delete groups and rejected users. By default the application provides three policies which are not editable and can not be removed:
- PUBLIC - If the user maps this policy to a resource, then anybody running Scishare will have access to this resource.
- PRIVATE - If the user maps this policy to a resource, then nobody will have access to this resource.
- TRUSTED - If the user maps this policy to a resource, then only the users who have their CAs matching the list of trusted CAs will have access to this resource.
User manages the policies through the Security - Manage Policies, adding items to database, and editing items. The policy manager represented by "Policy Manager" pane allows the user to do the following:
- Create policy - User clicks on "New" button shown on "Policy Manager" pane and then A dialog pops up asking the user to enter the name of the policy and then clicks on "OK" button. The new policy will be added to the list of existing policies.
- Edit policy - To edit a selected policy, user clicks on "Edit" button and then the "Policy Editor" dialog pops up allowing the user to manage the groups and rejected users.
- Delete policy - To delete a policy, user selects the policy and then clicks on "Delete" button. If the selected policy has been assigned to some resources, then dialog showing the list of resources protected by this policy, will ask the user to confirm removing this policy.
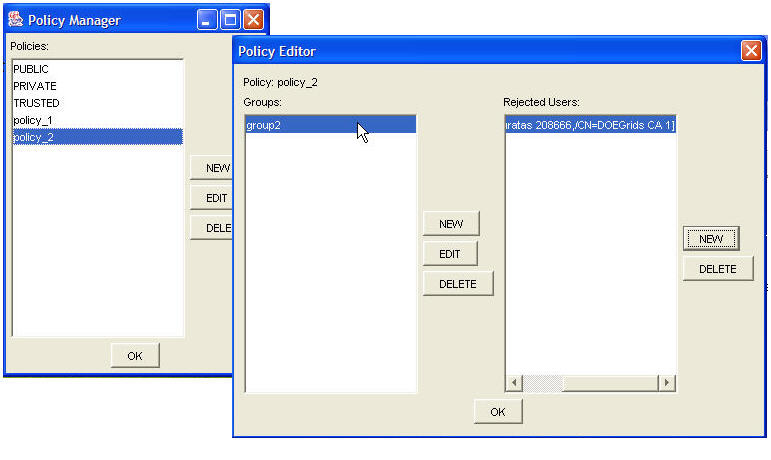
Manage Groups
A group is a collection of users, but it also can be empty. In general, the user creates a group and makes it available to any existing or new policy. Managing the groups consists on the following:
Scishare allows the user to manage the groups independently, by just selecting "Manage Groups" subitem from "Security" item menu, or through the managing policies.
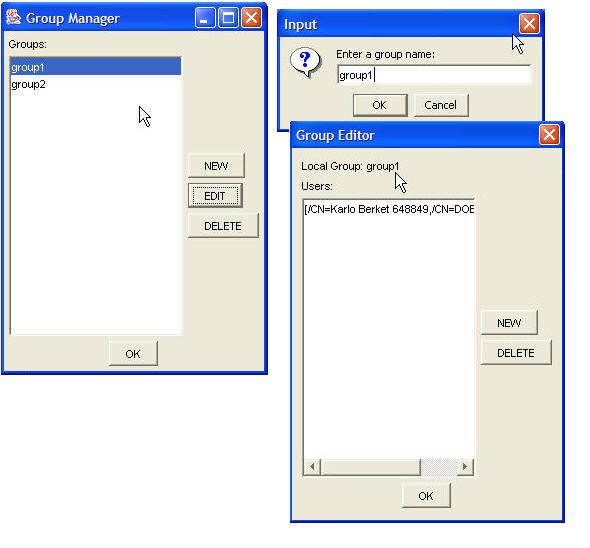
- Create a new group - To create a new Group, the user clicks on "New" button which pops up another dialog asking the user to enter the name of the new group.
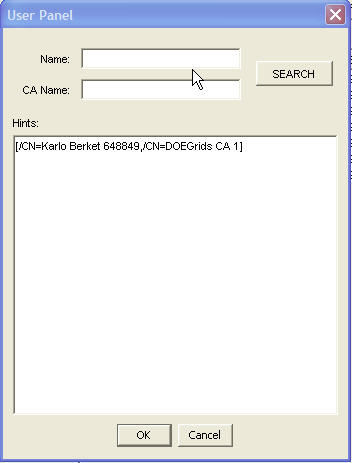
- Edit a group - Editing a group has to do with adding or deleting users from this group. The user can edit a selected group by clicking on "Edit" button. This will create a "Group Editor" dialog showing a list of users belonging to this group where the user can add a new user or delete a selected user. If the user clicks on "New" button, this will pop up a dialog "User Panel" where the user can search for new users. This dialog gives the user option to narrow the search based on the Name of the new user and/or a CA name for a new user. If user clicks on "Search" button, then this will take the user to "URL Panel" dialog. After the user selects the user from the list of users retrieved from LDAP , clicking "OK" button on previous dialogs will add the selected user in the selected group.
- Delete a group - To delete a group, the user selects the group and clicks on "Delete" button.
Search for Metadata
This is represented by a "Search" tab wich is shown on succesful startup. The search pane is split into two areas. The left side of the border represents the pane where the user creates the query and starts the search. The right side represents the pane where the search results are shown. Here, the user can manage the existing searches and start transfering files. In the search pane the user can do the following:
- Create a basic query
- Create an advanced query
- Start a search
- Restart a search
- Remove a search
- Download a file
- Create a basic query To create a basic query the user enters an expression in the "File Name" field. Optionally, the user can check the "Exact" box. For example, if the user is looking for some jar files available for sharing, just by entering "jar", he will get information about every file that he is authorized for and has "jar" in its name. If the user clicks on the "Clear" button, then the information in the "File Name" field will be deleted.
- Create an advanced query. To create an advanced query, the user selects a field in the Advanced Search drop down list and then fill in in the field that has been already created in the same pane. This version of Scishare lets the user to create up to three additional information type to create an advanced query, which are the file description, minimum, and maximum size. If the "Basic Search" option is selected, then the previous fields for advanced search will be removed. If user clicks on "Clear" button, then the information in the query fields will be deleted.
- Start a search After a query is created, user clicks on "Search" button. If the fields are empty no actions will be taken. For each search a tab is created, which contains the search results. The results of the search are shown in a tree table style where files of the same content are grouped together. The metadata that the user gets back as search results has this information:
- File name
- Description of the file
- Size of the file
- Last modified
- Source of the metadata, which is the IP Address.
- User Identity which authenticates who is the sender of metadata
- Trusted, which is a booloean value showing whether or not the sender of metadata is in the user trusted list.
The same information can be seen by moving the mouse on a row of the search result table where the user is interested. This will create a tooltip showing the information described above.
Above the table are three buttons where the user can manage an active search (stop, restart, pause, resume, remove) By clicking on the column header, the user can sort the search results in ascending or descending order.
- Restart a search Click on "Restart" button to restart a search. This button will change to a "Stop" button.
- Remove a search Click on "Remove" button to remove a search. This will remove all search results and the tab mapping these results.
- Select and start downloading a file At this point, the user can select files for download. If the user selects a group of file descriptions with the same content, represented by a folder icon, then the file will be downloaded in parallel. In order to download in parallel a file from multiple resources or from a single source, the user right clicks on the selected row and choose either "Download" or "Download To". By choosing "Download" the file will be stored in the download folder set in the preferences. The other option will ask the user to choose an alternate location for the downloaded file. Another way to download a file is by double clicking on the selected file.
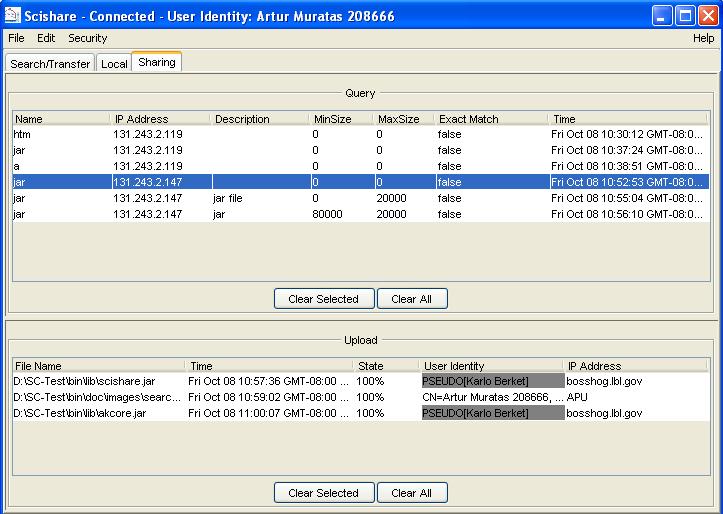
If the user has chosen to show the incoming queries they are displayed in the Search pane. This version of Scishare provides the following information for incoming queries.
- Name, which should match a file or a group of files available for sharing from the user.
- IP Address of the source who sent the query.
- Description of the file(s).
- Minimum size of file(s).
- Maximum size of file(s).
- Exact, the mode of the query.
- Time, the time when the user gets the incoming query.
The application saves the state of search results and incoming queries on exit and loads it on start up.
Search Panel

Transfer Data
The transfer pane shows information about all transfers. It is accessed by clicking on the "Transfer" tab.
If the user right clicks on a row in the download table, the following options are provided to manage an active transfer:
The download table displays the name of the file being download, the destination directory, the size of the file, the progress of downloading, the time is left, and finally the status of downloading. If user is downloading in parallel and one or more of the selected sources do not respond, then the application will try other sources or the ones that send respond back.
- Pause
- Resume
- Restart
- Clear
If the user has chosen to show the upload results they are shown in the upload table in the Transfer pane. "User Identity" and "Trusted user" columns are added to this table. They show who are the users downloading from this user, and also whether or not they are in the trusted list of the users.
The application saves the state of transfer and upload results on exit and loads it on start up.Local Manager
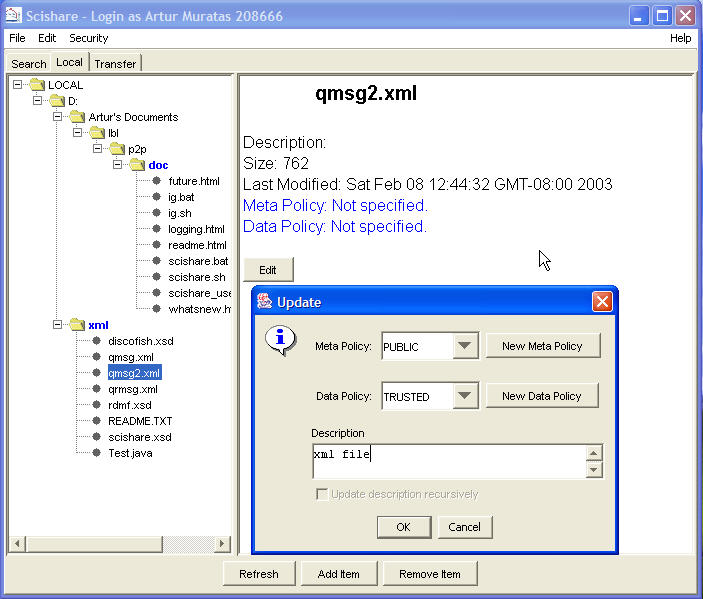
The local manager lets the user manage the files that are available for sharing. It is accessed by clicking on the "Local" tab in the main frame of the application.
The left side of the local pane is a tree representation of the shared items. The right side displays the information about the item is selected in the tree. The list of the options available to the user to manage the files for sharing is:
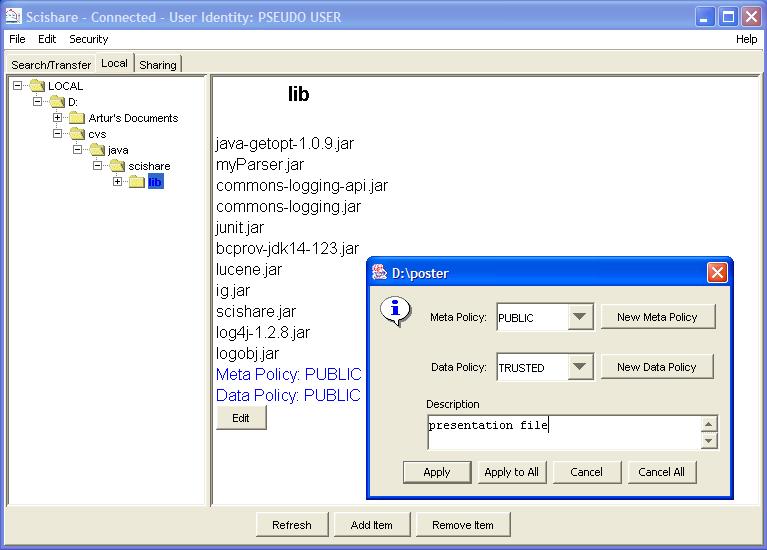
- Add item(s) New files are added to the shared items by clicking on "Add Item" button in "Local" pane. The user then selects a file or a group of files from the file chooser dialog and clicks the "OK" button. After that, another dialog pops up asking the user to apply or cancel add item action. The user can set the description and also map a policy to each of the file(s) being added. The user can have different policies for protecting metadata and data. If the user selects NO POLICY from the list of policies, that means there is no user specified policy for the resource. If anybody search for metadata or try to download this file, then the application will check in a higher level in the hierarchy until it finds a policy or until it reaches the root which is LOCAL. By default LOCAL has PRIVATE policy for both metadata and data and that is not editable.
- Remove shared item(s) The user can remove only subscribed items (the ones colored in blue or red). A subscribed item is marked red if it has been removed from the local filesystem; otherwise it is marked as blue. An item is removed by selecting the file to be removed and then clicking on "Remove Item". If the selected file is a folder, then user will be asked to confirm removing the folder contents.
- Edit shared item(s) Editing the items consists on changing the description and the policies mapping for these items. Every item in the hierarchy tree is editable except the root. To edit an item the user selects the item and then click on "Edit" button. This will initiate a dialog where the user can change the description, and change policies for metadata and data.
- Refresh The user is provided with the option to synchronize the application with the local filesystem. That means, all modifications of the files outside the application like modifying a file, deleting a file or list of files, and adding new files to the subscribed item (folder) will be updated in the application. The user will specify throug the preferences how the synchronization of the database will be done (automatically or manually by clicking on Refresh button).
The user can also sort a selected folder in the hierarchy by right clicking and selecting the option (by name, size, and last modified date). The shared item information is stored when the application exit and is loaded in the start up.
How to use URL Panel
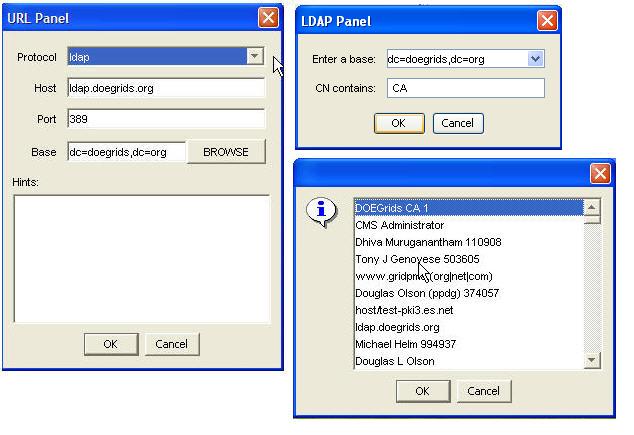
URL Panel dialog is used to retrieve CAs through CA manager or users from LDAP through editing policies or editing groups. URL Panel asks the user to enter the values for Host, Port, and Base. This version of Scishare support only "ldap" protocol. Further, there is a list of hints that shows all URLs previously used to create CAs or users. If a hint is selected, all the fields will be populated with the required information. After "OK" button is clicked then another dialog will pop up "LDAP Panel" allowing the user to enter the base and the name for the CN. To get CAs user clicks on "OK" button and a dialog will pop up showing a list of CAs and users. At this point, the user can make the selection and finish editing CAs list, rejected user list through the policies, or the group.
What are Rejected Users
A rejected user represent a user who can not have access to a resource. The policy protecting the resource has that user in the list of rejected users. This list can be creating through editing the policy. If the user clicks on "New" button of rejected users pane in the "Policy Editor" dialog, a dialog titled "User Panel" will pop up where the user can search for new users using URL Panel dialog. The selected user will be added to the rejected users list after "OK" button is clicked.
How to use User Panel
User panel represents a dialog where we can search the LDAP for user certificates through URL Panel. Once we get the user that we're looking for, we can either add him to the rejected list of users through Policy manager or to the group through Group manager. If the user clicks on "Search", then the URLPanel dialog will pop up.
Preferences
When the user launches Scishare for the first time he/she will need to set up preferences, the security device and their identity.
The preferences are set up through a succesion of dialogs:
Logging
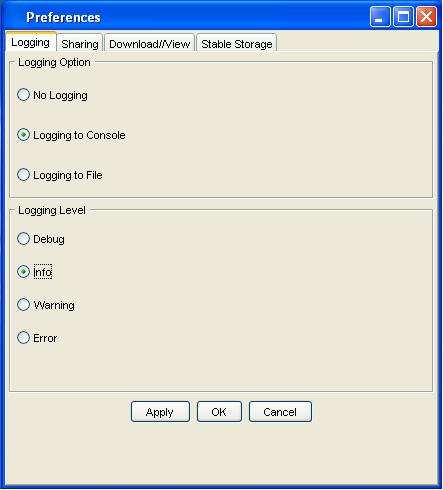
Logging Preferences
- Select logging Option. By default, "No Logging" option is selected. The other two options which can be used for logging are "Logging to Console", and "Logging to File".
- Select logging level. If one of the last two logging options are selected then the user can select the level of logging. "Debug" level represents the highest level in the hierarchy and "Error" represents the lowest level. That means if the users selects "Debug" all other level will be activated. On the other hand, selecting "Error" level will deactivate the other levels and show only "Error" level.
Sharing
Sharing Preferences
- Enable sharing of metadata and data. By default sharing metadata is turned ON and sharing data is turned OFF. The user can change these settings by clicking on the check boxes for metadata and data sharing.
- Define the ports for metadata and data servers. This is done by changing the values in "Metadata Server Port:" and "Data Server Port:" fields.
- Define the IP Address if behind NAT. NAT takes a computer's internal IP and converts it to the external IP when sending data to the internet, and when data is received from the Internet for that computer, it translates the external IP to the internal IP so that it can be routed to the correct computer. This is useful in a home network. User can click on "Behind NAT" button to set the NAT address. If "Enable NAT" radio button is selected the application will find NAT address and set that value in the NAT field. Otherwise the user can set a new NAT address. These changes will take effect after the user restarts the application.
- Define the multicast IP address, port and group TTL (Time To Live). The user can also use a proxy for multicast by clicking on the "Proxy" button. This option can be used when the intergroup is running in some other machine rather than locally. By default, the intergroup will run locally.
- Connection Options If the user can set the application to connect at the start up. This will start the services for sharing data amd metadata unless they are unchecked from the user.
Download//View
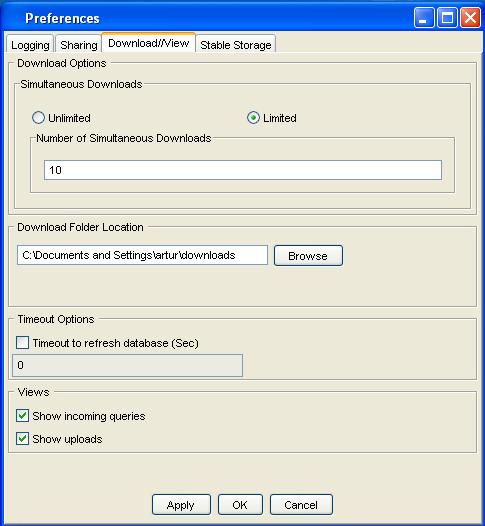
Download//View Preferences
- Define the number of simultaneous downloads. This is done by clicking on "Unlimited" or "Limited" radio buttons. If limited is selected then the user can enter a numeric value defining the number of simultaneous downloads.
- Select the folder where the transfered files will be stored. This is done by clicking on the "Browse" button and selecting the folder where the user want to store the downloaded files.
- Set the timeout for synchronizing the database. Sharing/View pane has a Timeout Option area where the user can choose how the database will be synchronized against the local file system. If the "Timeout to refresh the database" box is selected, then the numeric value set in the field represents the frequency in seconds of synchronization. If the box is not selected the user will be able to initialize synchronization in the Local view.
- Enable the upload and incoming queries views. The "Views" area lets the user make upload and/or queries views visible.
Stable Storage
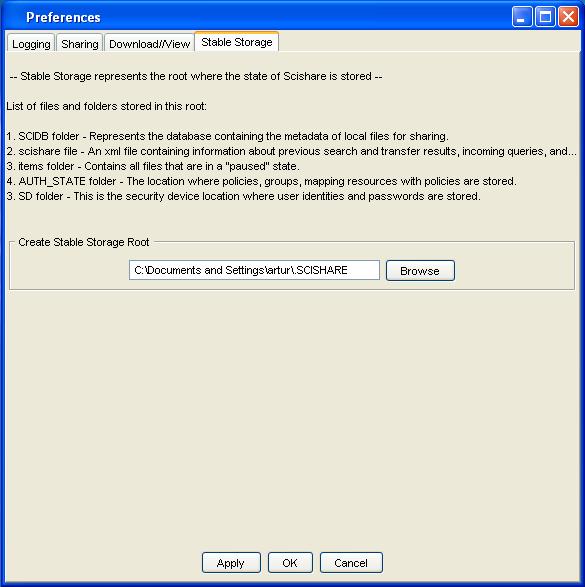
Stable Storage Preferences
- Set stable storage location. This can be done by cliking on "Browse" button and selecting the folder which will be used as a stable folder to store Scishare files and folders.
Preferences can be changed when Scishare is running. The user can click on the "Edit" menu item, and then on Preferences. By default, the Logging pane will be shown, but the user can select any preference pane by just clicking on the tab showing the name of the preference pane. In order to update any change is preferences, the user should click on "Apply" or "OK" buttons.
Additional information pertaining to this project is available at http://dsd.lbl.gov/P2P/file-share
Bug Reports and Feedback
Submit a bug or request a feature to: Bug and Feedback Reports
Related Pages
For additional information, refer to:
- Project Information
- InterGroup Protocols
- Distributed Systems Department home page.
Glossary
- authenticate
- To verify the identity of another party in a communication. In Scishare, authentication is provided through TSL communication.
- authorization
- To give access to a resource to an authenticated user based on policy protecting the resource.
- CA
- Abbreviation for certificate authority.
- certificate
- A document that has been digitally signed by a trusted party. Scishare uses X509 based
certificate.
- certification authority (AKA certificate authority)
- An entity trusted to "vouch" for the identity of a user. In a public key infrastructure,
a certificate authority signs an identity
certificate for the user.
Abbreviation: CA.
See also user, identity certificate.
- CN
- Abbreviation for common name. A common name is a person's given
name i.e John Smith.
- LDAP
- Abbreviation for the Lightweight
Directory Access Protocol
- Lightweight Directory Access Protocol
- A protocol "designed to provide access to the X.500 Directory
while not incurring the resource requirements of the Directory Access
Protocol" [RFC 2559].
To translate: the Lightweight Directory Access Protocol (LDAP) is used to communicate with the ISO/OSI directory service. Broadly defined, a directory is a "special purpose [database], usually containing typed information. " An example of an Internet-based directory is the Domain Name Service (DNS). A directory accessed via LDAP, however, can contain any kind of information, unlike the special-purpose DNS directory. We refer to a directory accessible via LDAP as an LDAP server.
An LDAP server is used as a Registration Agent (RA) by the Netscape CA. All valid certificates are entered into an associated LDAP server, and are removed when then are revoked. Thus one can check if a certificate has been revoked by looking it up in the CA's LDAP server. If it is not found, it is assumed to have been revoked.
- NAT
- Network Address Translation
.P12 file - PKCS #12 A standard that specifies a portable format for storing or transporting a user's private keys and Certificates.
The file extension assigned to all Certificates exported from Netscape Communicator using the PKCS #12 standard.
- Private Key
- A mathematical key (kept secret by the holder) used to create
digital signatures and depending upon the algorithm, to decrypt
messages or files encrypted (for confidentiality) with the
corresponding public key.
- Secure Sockets Layer protocol
- A network protocol that allows the two ends of a unicast
communication link to authenticate
one another and to establish an encrypted connection.
Scishare and most other SSL-enabled applications use SSL version 3.
Abbreviation: SSL.
See also Transport Layer Security protocol.
- SSL
- Abbreviation for the Secure Sockets
Layer protocol.
Abbreviation for the Transport Layer Security protocol.
Transport Layer Security protocol.
The IETF's adaptation of SSL, version 3. The IETF's Transport Layer Security working group is in charge of the standardization process.
-
Abbreviation: TLS.
