|
What appears below are my personal notes I wish were part of my long-term memory but don't always seem to fit. I strive for accuracy and clarity and appreciate feedback. If applying any of this information anywhere, confirm for youself the correctness of your work as what you see below might very well be, albeit unintentionally, incorrect or misleading. These notes are here as an easy reference for myself.
Information worthy of a more formal presentation will appear elsewhere than this "Scratch" area. - ksb
The following is how to setup and maintain a CVS branch of a particular cvs project. All details of branch management are not attempted here, just enough to enable you to create a personal branch for yourself, commit to that branch without effecting the mainline of that project's development, then merge your changes from the branch back into the trunk.
| Table of Contents | References |
A static tag is a 'snapshot in time' identifying a specific set of files each at a specific revision. Static tags are used to identify a release or some other milestone in development.
A branch tag identifies a specific branch rather than a set of files each at some revision. This will become clearer below..
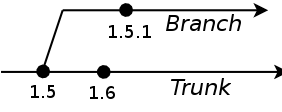
Branches on the other hand, are implemented in CVS by being 'sticky' to a branch tag where commits are allowed and go into that branch rather than the Trunk. In this sense a branch tag is also known as a 'sticky tag'. So if you have a branch based at the above file's 1.5 revision you can now make a commit to that branch. The new file will have revision number similar to 1.5.1 meaning it is the first revision based on revision 1.5. This is a completely different revision of the file from 1.6 as it is on the '1.5 branch' of that file.
Creating a branch is done with two commands: 1) Tag the base point of the branch and 2) Create the branch tag. These are both done with the 'cvs tag' command and I suggest using the following convention for naming tags: USERNAME_PROJECT-NAME_[BASE|BRANCH]_YYYYMMDD. It is kind of long but it clearly identifies what the tag is for. There are a few things to consider before creating the branch so here it is spelled out:
Start in your CVS working dir in the project directory you want to branch and bring it up-to-date with the head of the Trunk. Let's use as an example the daq-common project.
$ cd ~/CVS_workspace/daq-common
This next command will update all the files from the current directory on down, to be the most recent revisions committed to the Trunk. This is most likely where you want to start your branch.
$ cvs up -A
This can be confirmed with the 'cvs stat' command on a sample file:
$ cvs stat project.xml
===================================================================
File: project.xml       Status: Up-to-date

   Working revision:    1.8
   Repository revision: 1.8     /path/to/your/cvs/repo/daq-common/project.xml,v
   Sticky Tag:          (none)
   Sticky Date:         (none)
   Sticky Options:      (none)
Note that both the working revision (yours) and repository revision (the latest) are the same (1.8) and not sticky to anything.
Now create the base tag, identifying the 'branch point' of your branch, following the USERNAME_PROJECT-NAME_[BASE|BRANCH]_YYYYMMDD naming convention for creating tags:
$ cvs tag KSB_DAQ-COMMON_BASE_20041025
This will print out information about all the files it is tagging.
Again following the tag naming convention:
$ cvs tag -r KSB_DAQ-COMMON_BASE_20041025 -b KSB_DAQ-COMMON_BRANCH_20041025
This creates the BRANCH tag based at the BASE tag created above.
This can be done to any working directory of the project if you want to work on the branch in that working directory. Use the 'cvs update' command to move your working directory onto the branch:
$ cvs up -r KSB_DAQ-COMMON_BRANCH_20041025
This makes all the files in your working directory 'sticky' (in the second sense) to the branch you just created. It doesn't change the files, just where commits to them will go. To confirm this with particular file, use the 'cvs stat' command again:
$ cvs stat project.xml
===================================================================
File: project.xml       Status: Up-to-date

   Working revision:    1.8
   Repository revision: 1.8     /path/to/your/cvs/repo/daq-common/project.xml,v
   Sticky Tag:          KSB_DAQ-COMMON_BRANCH_20041025 (branch: 1.8.4)
   Sticky Date:         (none)
   Sticky Options:      (none)
Notice that the revision is the same, but now there is a sticky tag and it is the branch we just created.
Working on the branch, once your working directory is sticky to that branch, is done exactly the same as if working on the Trunk. The difference is that commits go onto the branch rather than on the trunk (which can be confirmed by using the 'cvs stat' command). After making a changes to a file, the global '-n' flag used with the 'cvs update' command is useful to quickly see the state of a working directory:
$ cvs -nq up
M project.xml
So the file 'project.xml' has modifications. Committing those changes with the 'cvs commit' command:
$ cvs ci -m "Minor changes to branch demo" project.xml
Checking in project.xml;
/path/to/your/cvs/repo/daq-common/project.xml,v  <--  project.xml
new revision: 1.8.4.1; previous revision: 1.8
done
The new revision number '1.8.4.1' rather than '1.9' means that this commit is on the branch (based at revision 1.8) rather than going onto the Trunk, which would have been revisions '1.9'. Here is what 'cvs stat project.xml' has to say:
$ cvs stat project.xml
===================================================================
File: project.xml       Status: Up-to-date

   Working revision:    1.8.4.1
   Repository revision: 1.8.4.1 /path/to/your/cvs/repo/daq-common/project.xml,v
   Sticky Tag:          KSB_DAQ-COMMON_BRANCH_20041025 (branch: 1.8.4)
   Sticky Date:         (none)
   Sticky Options:      (none)
So we are up-to-date and on the branch.
Once you are finished with the branch and made all your commits to it, you merge all the changes made on that branch into the Trunk. This is, in effect, simply replaying all the modifications you made on the branch, into a Trunk working directly, then committing those changes to the Trunk. Breaking this down into 3 steps:
To merge into the Trunk you need to work in a Trunk working directory. Switching back to a Trunk working directory uses the same command as used in step 1 when creating a branch above.
Use the 'cvs up -A' command to move your working directory onto the branch:
$ cvs up -A
This removes all 'stickyness' of your working directory in effect making your working directory based on the Trunk. If you have any uncommitted changes in your branch working directory this command will keep those files there. I'm assuming here that you don't have any such files. If you do, then you are probably better off also using the '-C' flag of update or simply using a newly checked out working directory for this merge.
A 'cvs stat' now shows we are on the Trunk (no stickyness):
$ cvs stat project.xml
===================================================================
File: project.xml       Status: Up-to-date

   Working revision:    1.8     Mon Oct 25 23:52:33 2004
   Repository revision: 1.8     /path/to/your/cvs/repo/daq-common/project.xml,v
   Sticky Tag:          (none)
   Sticky Date:         (none)
   Sticky Options:      (none)
You now have the old (Trunk) revision of the project.xml in your working dir but that's about to change.
Doing the merge itself uses the (surprise) 'update' command. This is done by identifying the branch you which to merge into the current working directory.
The '-j' (for join, I think) flag is used for this:
$ cvs up -j KSB_DAQ-COMMON_BRANCH_20041025
cvs update: Updating .
RCS file: /path/to/your/cvs/repo/daq-common/project.xml,v
retrieving revision 1.8
retrieving revision 1.8.4.1
Merging differences between 1.8 and 1.8.4.1 into project.xml
...
Examining this output is important as there is a chance that there are conflicts as a result of the merge. This could only happen if someone made changes to the same files, in the same places, on the Trunk, as you did on the branch. If that is the case then you will see messages about these conflicts and you will need to resolve those conflicts before proceeding.
Completing the merge is done by doing a commit into the Trunk of the changes that came from the branch. As you should always be concerned with, when doing a commit, make sure that the changes you are making are indeed correct by examining the code, running unit tests, etc.
Again the global '-n' flag used with the 'cvs update' command is useful to quickly see the state of a working directory:
$ cvs -nq up
M project.xml
Here we see that only the project.xml file is modified, and there are no conflicts (which are marked with a 'C' rather than an 'M'). Doing the commit:
$ cvs ci -m "Results of merge from KSB_DAQ-COMMON_BRANCH_20041025 branch."
cvs commit: Examining .
...
Checking in project.xml;
/tmp/cvsroot/daq-common/project.xml,v  <--  project.xml
new revision: 1.9; previous revision: 1.8
done
Making a note in the commit log that it is the result of a merge and the branch merged from can be very helpful if a particular change needs to be tracked to it's original commit.
To be honest, I will nearly always create tags marking the mergepoint (on the branch), the pre-merge and post-merge points (on the Trunk) when doing a merge. This allows an easy way to understand what a merge included, after the fact.
Although there are several things that can complicate branching and merging, when creating a personal branch where only one person is working on the branch and no one is working on the Trunk at the same time, things are quite simple. Here is a review of the procedure, with brief explanations of each command:
$ cd ~/CVS_workspace/daq-common                                               # Beginning in the project you wish to branch
$ cvs up -A                                                                   # Bring to head of the Trunk
$ cvs tag KSB_DAQ-COMMON_BASE_20041025                                        # Tag the base point of the new branch
$ cvs tag -r KSB_DAQ-COMMON_BASE_20041025 -b KSB_DAQ-COMMON_BRANCH_20041025   # Create branch based on base point.

$ cvs up -r KSB_DAQ-COMMON_BRANCH_20041025                                    # Move your working directory onto the branch
$ vi foo.java                                                                 # Edit in branch working directory
$ cvs ci foo.java                                                             # Commit changes onto branch

$ cvs up -A                                                                   # Get a Trunk working dir, to do the merge into
$ cvs up -j KSB_DAQ-COMMON_BRANCH_20041025                                    # Merge in changes from branch
$ cvs -nq up                                                                  # Look for conflicts
$ ant test                                                                    # Run unit tests
$ cvs ci -m "Results of merge from KSB_DAQ-COMMON_BRANCH_20041025 branch."    # Commit changes into Trunk with meaningfull log message.